A blog for computer science passionates.

Monday 9 December 2019

Hello Friends!!!

In this article, we are going to start Java Programming. There are lots' of things that are there in Java, first of all, we know about Java is a programming language. it is an Object-Oriented Programming Language. And we also know about different Concepts of Object-Oriented Programming languages such as class, object, abstraction, encapsulation, inheritance, polymorphism, etc. (If you don't know the concepts don't worry we will discuss all the things when we will look at the examples)

So, Lets' start with features (Characteristics) of Java:
There are lots' of different features of Java and through that Java becomes a powerful and most used programming language. Let's start
  • Platform Independent
  • Object-oriented
  • Simple
  • Secure
  • Portable
  • Robust
  • Multithreaded
  • Interpreted
  • High Performance
  • Distributed
  • Dynamic
See, the rich list of features, Let's start with
  • Platform Independent: Java is an Open source and platform-independent programming language. The team James Gossling design and develop this language with the goal of platform independence. The program written in Java executes on virtual machine i.e. JVM and JVM is available on different platforms. So Java becomes platform-independent.
  • Object-Oriented: Java is an Object Oriented Programming language, like C++. Some object-oriented features of C++ inherited by Java. As Java is an OOP, an object is the key or core part of Java, everything in Java depends on the Object to manage data and perform different operations by using methods.
  • Simple: Java is simple, as it is inherited from C and C++. If you are familiar with C and/or C++ programming, it will become easy to work with Java programming. 
  • Robust: Java is robust as it works on different platforms. The main benefit of the strictness of Java is it reduces the number of errors as it is strictly typed language and it checks error compile time as well as runtime also.
As we know that Java has a rich set of characteristics thus Java becomes most popular in this article I cannot add all the features so in the next part we will learn all the remaining features of Java.

That's it for this article, Have a Happy Coding and programming in Java...☺😊

Monday 25 November 2019

Hello Friends!!!
In this article, we are going to learn more methods of NumPy module. At the end of this article, you will be able to work on,
  • ones
  • zeros
So, let's start with these methods, these two methods are powerful as it is generally used to build feature vector with some default values while developing deep learning models.
  • numpy.ones() - method returns an array with default value 1.0 with given shape or we can say newly returned array filled with 1.0 or 1 based on data type and shape.
    • Syntax: numpy.ones(shape, dtype=None, order='C')
    • Here, shape - is the shape of an array that you want to retrieve.
    • dtype - is an optional argument, represents the data type of an array that you want to retrieve, the default data type is float.
    • order{'C','F'} - is an optional argument, represents whether to store multi - dim array in C-style or Fortran style. C-style represents row-major and Fortran-style represents column-major in memory. 
  • It returns ndarray object in the form of an array with the given shape, order and data type.
Let's move to another method.
  • numpy.zeros() - method returns an array with default value 0.0, with given shape or we can say newly returned array filled with 0.0 or 0 based on data type and shape.
    • Syntax: numpy.zeros(shape,dtype=float,order='C') 
    • Here, shape - is the shape of an array that you want to retrieve.
    • dtype - is an optional argument, represents the data type of an array that you want to retrieve, the default data type is float.
    • order{'C','F'} - is an optional argument, represents whether to store multi - dim array in C-style or Fortran style. C-style represents row-major and Fortran-style represents column-major in memory. 
  • It returns ndarray object in the form of an array with the given shape, order and data type.
Let's take an example of the above methods:


Wednesday 20 November 2019

Helloooo Friends!!!

In the previous article, we have seen Bayes' theorem now we are going to learn Naive Bayes' classifiers.
  • It is based on Bayes' theorem.
  • It gives a strong predicted answer by applying Bayes' theorem. So, it is known as Naive Bayes' classifier.
Now, let's start with How does it work?

Let's take an example if we want to approve an application for a credit card, we need to check the age of a person, an income of a person, credit score, year of employment of a person, debts of a person, etc. Now we have two possibilities, approved or not approved. So, if we consider our outcomes as Res=1 if approved and Res=0 if not approved.

Add this problem to Bayes' equation so our problem with formula becomes something like:
Fig. 1 Whether to approve the application of credit card or not using Bayes' Theorem
Now we get the result Res=1 if the P(Res = 1 | x1,....,xn) > P(Res = 0 | x1,....,xn) otherwise Res=0.
P(Res = 1) is the prior probability, it works without knowing the values of x. (Here, x = {x1,x2,..., xn}).  So, that it works for P(Res = 0) + P(Res = 1) = 1. As we all know the total probability is 1. 
Next thing that we can to consider, P(Res | x1,....,xn) is class likelihood is the conditional probability that is Res has associated value of x.

And lastly, we have evidence or marginal probability is P(x1,....,xn) and is work when we consider the value of x, and we do not think whether the value of x is positive or negative.

Afterward, we can get the posterior probability is the combination of prior and result of Bayes' rule. So, as we have already discussed about that but again we think in the formula for our example with posterior probability is something like
Fig. 2 Posterior Probability
And Bayes' classifier chooses the result with the highest posterior probability from all the result. See the below formula for Bayes' classifier.

Fig. 3 Bayes' Classifier


So, in a simple meaning of Bayes' classifier, it is based on conditional probability and Bayes' rule, check for the posterior probability and choose the maximum or highest posterior probability to achieve the Classification task.

Now it is simple, isn't it? I hope you enjoy and learn this classifier easily.


Monday 18 November 2019

Hello Friends!!!
Let's start again with NumPy module.
Today's methods for this module are mentioned below and at the end of this article, you will be able to manage numpy array with these methods.
  • linspace
  • empty

Linspace

  • numpy.linspace - this method is used to returns an array. All the numbers are evenly spaced calculated by the first two arguments [start, stop].
    • Syntax: numpy.linspace(start,stop, num=50, endpoint=True, retstep=False, dtype=None, axis=0)
    • Here,  start - represents the starting value of the array that one wants to print or return.
    • step - represents the end value.
    • num - represents number of steps or elements we want to generate. it is an optional argument and it must not any negative number.
    • endpoint - is an optional argument, if it is set to true, it stops when stop element occurs.
    • retstep - is an optional argument, if it is set to true, return elements with a specific step. it simply means return steps.
    • dtype - is an optional argument, the data type of output array. 
    • axis - is an optional argument, the axis in the result to store array elements.
  • It returns two different values
    • elements in the form of ndarray
    • step is optional if retstep argument is set to true.

Empty

  • numpy.empty - returns a new array, of given shape and data type. no need to initialize array.
    • Syntax: numpy.empty(shape,dtype=float,order='C')
    • Here, shape - represents the shape of an array it maybe an integer or tuple.
    • dtype - is an optional argument, to represents data type of an array.
    • order - is an optional argument, to represents how to store data row wise or column wise. if it is in 'C' order, it represents row wise  otherwise 'F' to give column order. 'C' and 'F' represents the name of programming languages 'C' for 'C' language and 'F' for Fortran.
  • It returns ndarray of arbitrary data. 
  • Example,

Tuesday 12 November 2019

Hello Friends!!!

Today in this article, we are going to learn about Naive Bayes Classifier, One more algorithm for classification. It is based on Bayes' theorem.
So, first of all, let's take a look at Bayes' theorem, this theorem is based on conditional probability.

What is Conditional Probability?

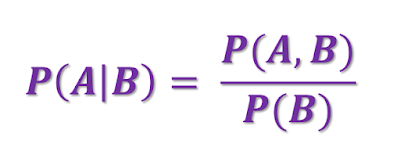
The probability which is assigned to an event A when it is known that another event B has occurred, or which would be assigned to A if it was known that B had occurred, which is known as "Conditional Probability" of A given to B. For example, the probability of getting raincoat in the market is connected with season.
Mathematical Definition of Conditional Probability
P(A|B) - represents the conditional probability of the event A given the event B; the probability assigned to A when it is known that the event B has occurred;
P(A,B) - represents the joint probability of event A and event B; i.e. the probability that both events A and B will occur.
(Resource: Probability and Statistics
for Business Decisions By Robert Schlaifer Professor of business administration Harvard University)


Now, we move to Bayes' theorem:

Bayes' theorem is used to describe the probability of an event based on some condition that may be related to an event. 
Fig. 2 Bayes' theorem equation

When we apply Bayes' theorem, it checks how the degree of beliefs, expressed as a probability.  It also accounting evidence.
 Let's understand the equation,
Here, P(A|B) represents a conditional probability, shows when the probability of an event A occurring given that event B is true.
same as with P(B|A) also a conditional probability, shows when the probability of an event B occurring given that event A is true.
P(A) and P(B) both are the probabilities of observing A and B independently and there is no relation with each other.

One more thing with this formula is: P(B) should not be 0.

For example,
In any medical test, such as Diabetes, the test is positive or negative. if the test is positive, detects diabetes otherwise not. we put this situation in the above equation.
P(A)=Diabetes detected
P(B)=Test is positive
P(B|A)=(Test = Positive | Diabetes = True)

P(A|B)=P(B|A)*P(A)/P(B)
P(Diabetes = True | Test = Positive)= P(Test = Positive | Diabetes = True)*P(Diabetes = True)  / P(Test = Positive)

That's it for this article in the next article we will learn Naive Bayes' theorem. I hope, you learn new things from this article...

Happy Learning....☺😊

Monday 11 November 2019

Hello Friends!!! Welcome again,
Today we are going to discuss more methods of NumPy module. I hope you all do well with NumPy. So, let's start with NumPy and learn some more methods.

  • numpy.delete - this method is used to remove elements from an array. it returns a new array with sub-array along with axis that is deleted.
    • Syntax: numpy.delete(array,index,axis=None)
    • Here, array - represents an array from which you want to remove elements.
    • index - represents indexes of sub-arrays to remove along the specified axis. it may be any object.
    • axis - is an optional parameter. represents an axis along which to delete the sub-array defined in an index argument. 
  • It returns a ndarray. A copy of an array with the elements specified by the index removed.
  • Example,
  • numpy.concatenate - this method is used to join different arrays along with an existing axis.
    • Syntax: numpy.concatenate((ar1, ar2, ...),axis=0,out=None)
    • Here, ar1, ar2 - represents a sequence of arrays, all the array must have the same shape.
    • axis - is an optional argument, represents axis along which arrays will be joined. here default value of this parameter is 0.
    • out - is an optional parameter, it is ndarray object. represents the destination to place the result.
  • It returns ndarray object after concatenation of arrays. 
  • Example,  

These are methods of NumPy for this article that's it, in next article we will learn more methods.
Happy Learning & Coding...☺😊

Wednesday 6 November 2019

Hello Friends!!!
This article takes some time, as I do work on some other articles also. Let's again work on NumPy, Kudos you all have learned some methods already from other articles of this module successfully. Now let's start with new methods with examples.
image (source: pixabay.com): Peoples are in a queue and new peoples are appended to the queue at the end of line
  • numpy.append - This method is used to add (append)new values in an array at the end. 
    • Syntax: numpy.append(array,values,axis=None)
    • Here, array - is array-like values to be appended to the copy of the main array.
    • values - is array-like values to be appended to the copy of the first argument array. it should be the same shape as the first argument has.
    • axis - is an optional argument. it is used to set the axis on which array and values are to be appended.
  • It returns ndarray object. copy array with values to the axis and append to ndarray.
  • Example,
  • It also gives ValueError, if axis of the array and values are different.

  • numpy.insert - This method is used to insert element(s) on specific index.
    • Syntax: numpy.insert(array,index,values,axis=None)
    • Here, array - is an array.
    • index - is an integer value that defines an index on which values are inserted. Even we can pass multiple integer indexes in the form of an object.
    • values - is values to be inserted in an array.
    • axis - is an optional argument, it is used to set the axis on which array and values are to be inserted.
  • It returns ndarray object with all inserted values to the array.
  • Example,
  • Now, you can find the difference between append and insert. There is a simple difference through append you can insert an element at the end of the array only and through insert method, you can insert element(s) on any indexes that you have mentioned in index argument.
So, that's it for this article, in the next article we'll learn more methods.
Enjoy and learn new things every day, every time...☺😊

Wednesday 30 October 2019

Hello Friends!!!

In this article, we are going to discuss NumPy methods. In the previous article, we have learned NumPy attributes. (If you did not know different attributes of NumPy, please refer first) Now we are going to start different methods of the NumPy module.

  • numpy.arange - it returns numbers. it returns number in a sequence and defines an array of those numbers. it is equivalent to range (python in-built function).
    • Syntax: numpy.arange([start],stop,[step],dtype=None)
      • Here, start - is an optional argument. it defines start interval, the default start is 0.
      • stop - is compulsory, it is ending interval.
      • step - is also an optional parameter, it defines that with which value adjacent value is generated or increased.
      • dtype - is compulsory, but it also has the default value i.e. None. it represents data type of an array.
    • It returns ndarray object. i.e. array with type ndarray
  • Example, 
  • numpy.array - it returns an array.  
    • Syntax: numpy.array(object,dtype=None,copy=True,order='K',subok=False,ndmin=0)
      • Here, object - is a compulsory argument. in this argument, we need to pass any object that exposes an array interface.
      • dtype - is optional. it represents any desired type of array elements.
      • copy - is optional. if it is set as True, the object is copied.
      • order -is an optional argument. order maybe 'K', 'A', 'C', 'F' etc. is used to specify memory order. i.e. how elements are stored in memory. Here, K and A are unchanged and based on C and F order. C order means row-wise and F order means column-wise elements storing. default order is 'K'.
      • subok - is an optional argument. if this argument is set as True, it generates subclass array. otherwise it forced to be a base - class array. by default, it creates the base - class array.
      • ndmin - is an optional argument, describes the minimum number of dimensions of a resulting array. 
    • It returns ndarray object. 
  • Example, 
We will learn more methods in the next part of the article, through this article you can learn these two methods to create an array by using numpy.

Happy Coding...!!!☺

Wednesday 23 October 2019

Hello!!! to all CS Passionate,

In this article, we are going to learn different types of classification algorithms.
There are lots of different algorithms to solve classification problems. In which some of them are,
  1. Logistic regression
  2. Naïve Bayes classifier
  3. Nearest neighbor
  4. Support vector machine
  5. Decision tree
  6. Neural networks
  7. Random forest
And more, here in this part - 1 we are going to learn about,

Logistic Regression

Logistic regression is actually a type of regression, but it returns binary type of result so, we can use this algorithm for classification problems also, such as image is cat or not.
Logistic regression is a statistical method for regression analysis classification to conduct when the dependent variable is binary. such as pass/fail, yes/no, true/false, etc. it is a predictive analysis method like other regression methods. But we need to use logistic regression when we have a categorical target at that time we cannot use linear regression.

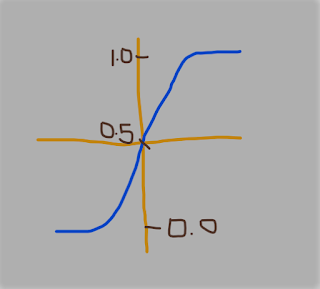
As it does not work linearly, it does not work for the straight line so, it performs the logistic function (the sigmoid function), as its results are between 0 and 1.
The formula for sigmoid activation function (logistic function):

1/(1+exp(-x))

(1.0)
The above formula returns a real-valued number, it returns numbers between 0 and 1.
Fig. 1.0 Logistic function (sigmoid curve). It generates output between 0 and 1.

How does Logistic regression works?

Logistic regression works on the same equation as linear regression. The linear regression equation is something like,
y^(i) = w0+w1x1(i)+w2x2(i)+...+wnxn(i)
(1.1)
The output of logistic regression σ(wTx). where σ is the logistic sigmoid function it uses the above formula (1.0). Let's assign wTx to z, so now our equation for logistic regression is σ(z). So, z = w0+w1x1(i)+w2x2(i)+...+wnxn(i) Now, to calculate logistic regression we need to work on probability. So, our equation becomes P(y(i) = 1) = 1/(1+exp(-z)).


Now, let's take an example, to predict cancer.

In the above example, we can classify cancer is 'malignant' or 'benign'. Hope you enjoy.
In the next article, we will learn about Naive Bayes Classifier. Till then learn logistic regression....☺

Tuesday 22 October 2019

Hello Friends!!!
In this article, we are going to discuss NumPy objects. In the previous article, we learned about NumPy and how to install NumPy? Now, Let's start with the NumPy module.

The main objective of the NumPy module is a homogeneous multidimensional array. All elements are of the same type, array indexed by a tuple of non - negative integer. In NumPy dimensions are called axes.

There is a class ndarray in NumPy. It works as an alias array.

The NumPy array is not the same as Python array, as python array only works with one - dimensional array.

Let's start with some attributes of ndarray object.

ndarray.ndim - it represents the number of axes of an array (here, axes is the dimension of array).
ndarray.shape - it also represents the dimension of array, but it shows tuple of integers which indicate size of different dimensions. For example (rows, cols) here, rows mean the first dimension of array and cols mean the second dimension of the array. But shape and ndim both are different attribute shape represents tuple and the length of tuple is represented by axes i.e. ndim.
ndarray.size - it represents the total number of elements of array.
ndarray.dtype - it represents the data type of elements in the array.
ndarray.itemsize - it represents the size in bytes of each element of an array.
ndarray.data - it represents the buffer containing actual elements of an array. we need not to use this attribute.

Example:


So, These are some important attributes in NumPy.

In the next article, we will learn about different methods of NumPy. All the best....👍

Thursday 17 October 2019

Hello Friends!!!
In this article, we are going to learn about the NumPy module. So, Let's staaaarrrrtttt........
Before we start you should know bit about Python.

What is NumPy?

NumPy is a python module, To work and perform numerical and some scientific calculations. Actually, the name also suggests Num (Numeric) Py (Python). It can work on N-Dimension array objects. and works powerfully with N - dim array as well as linear algebra.

It has lots' of different methods i.e. functions are available to perform lots of different numerical and mathematical operations in just a single line of code.

Why NumPy?

NumPy is a library module. Where Lists are equivalent to the array in Python, Python core library provides lists.

NumPy provides High Performance, where lists in comparison with numpy are low in the matter of performance. Some basic comparisons with Lists over NumPy:

  • NumPy occupies less memory space than lists
  • NumPy is faster than lists
  • It has lots of inbuilt operations of linear algebra.
Even NumPy works on one - dimensional as well as a multidimensional array and for any type of array it works faster with high performance.

How to Install NumPy?

Let's start with the installation of NumPy. (You need to install python first to work with NumPy)

pip install --user numpy

Here, --user becomes optional when we have opened user (user's directory in our cmd i.e. command prompt)

OR
if you are using pip3 just type
pip3 install numpy or pip3 install --user numpy

and NumPy is installed in your system. You can find more about installation on Official Site of NuPy SciPy Once Installed You can start development using NumPy.

In Next article, we will learn about NumPy functions and it's operations. Be ready...

Wednesday 16 October 2019

Hello Friends!!!

In my last article, I mentioned some important things that you need to learn for ML and DL. One of those is any programming language specially Python or R. But Python is more powerful and mostly used for ML and DL. As  it has lots of different and powerful libraries.
And today, I am going to tell you about those libraries which makes python more powerful. And one can develop ML or DL models easily by using Python.
  • NumPy - For numerical calculation
  • Pandas - For datasets
  • Matplotlib - For data visualization
  • sklearn - lot's of inbuilt algorithms and datasets
These are most important for ML. Now a days, some of them are very much popular and make easy to work and develop DL models simple and easy.
  • Tensorflow
  • Keras
  • Pytorch etc.
There are lots' of different modules and libraries in python for ML and DL. So, in my next article, we will learn about NumPy module of python.

So, be ready to learn NumPy. ☺😊

Tuesday 8 October 2019

Hello Friends!!!

Today, I am going to tell you about how to start with ML and DL. In some of my previous article, I have started ML but today I take this topic because before 6 to 8 months in one of my ML workshop some people asked me about,
How to start and what should we learn to start with ML or DL?
So, today I share this thing. here, below I mention some steps to start and what tools or things are necessary for ML.
First thing keep in mind is from any stream you belong don't worry, you can learn ML and/or DL.
  • Math
  • Statistics
  • Any one Programming Language
  • Basic SQL
All the above mentioned topics are necessary or mandatory for ML/DL. Now in all above points What should you learn?

MATH

In Math,  Linear Algebra is mandatory. in linear algebra you can start with below things.
  • scalar
  • vector
  • matrix
  • tensor
and it's operations such as, addition of matrix and matrix multiplication etc. Identity and Inverse Matrices. Even Eigendecomposition, norms, Linear Dependence and Span, Singular Value Decomposition, The Moore-Penrose Pseudoinverse etc.

STATISTICS

In Statistics, Regression and probability and Information theory are necessary. In which, random variables, probability distributions, conditional probability, chain rule, Variance and Covariance, Bayes' rule, Information Theory etc.

Any one Programming Language

Any one programming language is enough, but now a day Python or R are much popular for ML and DL, so here my suggestion is to learn Python or R but that doesn't mean java doesn't work with ML. Java has some popular libraries to work with ML but python is most used as python can work with less line of code.
for programming not only basic programming but algorithms and data structure even OOP is also necessary. So, this much in programming language.

SQL

Basic SQL i.e. queries and functions, triggers, events, procedures etc. this basic things also necessary for ML (SQL is used while working with data).

These above mentioned all the things are necessary, if you want to take dive in ML and/or DL.
After learning all the above mentioned things you can start with ML and/or DL.
So, Start from today. All the best...👍

Happy Journey for ML and DL.... 😊

Sunday 3 March 2019

Hello Friends,

In previous post, we have seen how to install NLTK? In this post we start with How to work with NLTK?

As we know, NLTK is a library in python to work with NLP. So, First of all what is NLP?

NLP - Natural Language Processing is to develop an application to understand Human Languages.
some examples,

  • Amazon Alexa
  • Google HomeMini, etc.
Some of it's application, Speech recognition, speech translation, understanding sentences, synonyms etc.

Where NLP is used?
  • Search Engine - in search engine we have seen, we speak a word and it answers. like google, yahoo etc, uses NLP.
  • Social Website Feeds - in social website like facebook uses news feeds.
  • Spam Filters - Google filters spam mails.
These all are the examples of NLP.


So, now let's start to work with NLTK.
Let's tokenize sentences,
Tokenize Sentence means we have a paragraph, and we split this paragraph into sentences. this process is known as tokenize sentences

Example,

from nltk.tokenize import sent_tokenize
sentence="This is an example of NLTK. Let's start with sentences tokenizer"
print(sent_tokenize(sentence))

O/P of above code

['This is an example of NLTK.', "Let's start with sentences tokenizer"]

Run the above code it will return list of sentences. 

Now, Let's see an example of word_tokenize. Like tokenize sentences return different sentence in list from group of sentences.
word_tokenize returns list of words from sentences it splits words.

Example,
from nltk.tokenize import word_tokenize
sentence="This is an example of NLTK. Let's start with sentences tokenizer"

print(word_tokenize(sentence))

O/P of below code

['This', 'is', 'an', 'example', 'of', 'NLTK', '.', 'Let', "'s", 'start', 'with', 'sentences', 'tokenizer']

So, Start with NLTK and try to tokenize sentences and words. in next post we will learn more in NLTK.

Happy Coding... :)
Hello Friends,

Today we are going to learn natural language processing by using python and nltk.

nltk - is one of the most popular library (Module) available in python for Natural Language Processing.
some other libraries are there for NLP:

  • NLTK
  • Apache OpenNLP
  • Stanford NLP suite.
  • Gate NLP Library etc.
NLTK (Natural Language Toolkit), is most popular NLP library first of all we need to install it.
So, let's install NLTK, for that open,

cmd select path of your python then run below command,

  • pip install nltk
After that just open idle and write below lines,


>>> import nltk
>>> nltk.download()
showing info https://raw.githubusercontent.com/nltk/nltk_data/gh-pages/index.xml


it will open below nltk downloader dialogue,

just click on download button it will install nltk. it takes some time to install all modules,

after installation we can start, development on nltk.